WSO2 Enterprise Service Bus is a lightweight enterprise service bus which delivers high performance. WSO2 Enterprise Service Bus is based on Apache Synapse and available under Apache Software License v2.0. WSO2 Developer Studio provides a Eclipse based SOA development environment for WSO2 products. With WSO2 Developer Studio 2.0.0 Beta, they provide a graphical editor for develop WSO2 ESB Configurations (Synapse Configurations).
Basically 'WSO2 Developer Studio - ESB Graphical Editor' consists of two pages. One page is a visual drag and drop editor and another page is a XML editor. Visual editor facilitates users to drag and drop components from the tool palette and simply connect them to build message mediation routes graphically. Configurations of components in the canvas can be done using Properties view. Editor will generate the relevant Synapse Configuration according to the design and generated configuration is viewed in the source view page.
Basically 'WSO2 Developer Studio - ESB Graphical Editor' consists of two pages. One page is a visual drag and drop editor and another page is a XML editor. Visual editor facilitates users to drag and drop components from the tool palette and simply connect them to build message mediation routes graphically. Configurations of components in the canvas can be done using Properties view. Editor will generate the relevant Synapse Configuration according to the design and generated configuration is viewed in the source view page.

Design View

Source View
Tool palette consists of Proxy Service, mediators and Endpoints. First thing is to do is dragging and dropping a Proxy Service from the tool palette to the canvas. Then you can drag and drop mediators and endpoint according to your expectation to relevant areas of the Proxy Service figure. There is no restriction for doing this (You can add an Endpoint before adding In Sequence) since connecting these mediators and endpoints is a manual thing.
How this can help developers ?
As the following figure depicts, mediation engine consists of Proxy Services, Endpoints, Sequences and Startup jobs. When a message is entered to the Proxy Service, the massage goes to the relevant Endpoint via In Sequence. And the response message is sent back to the client via Out Sequence. ESB graphical Editor basically follows this model. When we consider a proxy Service inside the ESB Graphical Editor it consists of areas for In Sequence, Out Sequence and Endpoints. This clear separation will lead to represent complex Synapse configurations in a uncomplicated manner.

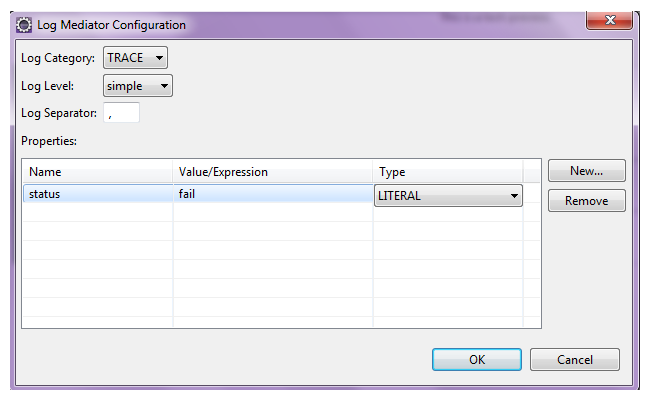
We can configure these Proxy Services, Mediators and Endpoints using properties view. Simple configurations like names, value types can be entered using this property view. And also this editor provides various types of dialog boxes to do some advance configurations. For example, see the following figures.

How this can help developers ?
As the following figure depicts, mediation engine consists of Proxy Services, Endpoints, Sequences and Startup jobs. When a message is entered to the Proxy Service, the massage goes to the relevant Endpoint via In Sequence. And the response message is sent back to the client via Out Sequence. ESB graphical Editor basically follows this model. When we consider a proxy Service inside the ESB Graphical Editor it consists of areas for In Sequence, Out Sequence and Endpoints. This clear separation will lead to represent complex Synapse configurations in a uncomplicated manner.

We can configure these Proxy Services, Mediators and Endpoints using properties view. Simple configurations like names, value types can be entered using this property view. And also this editor provides various types of dialog boxes to do some advance configurations. For example, see the following figures.

Developers who like to develop configurations manually can use Synapse Configuration source viewer as a text editor. This source editor consists of features like Syntax highlighting, content assist etc. So this is a valuable feature in ESB Graphical Editor even though these manual changes doesn't reflect to the visual editor page yet.
ESB graphical editor comes as an Eclipse plug in. This will be an advantage since most of the developers are familiar with Eclipse IDE.


